Showing posts with label PHP. Show all posts

[Tutorial] How to setup development environment for Twig on MacOS

The tools used in this tutorial are as following:
OS                 : MacOS 10.14.3
PHP version : >= 7.0
Twig version : 2.x

Introduction
Twig is a template engine for the web developers and designers to implement user interface template in PHP by built-in tags, filters, and functions. The benefit of using Twig to implement user interface template is enhancing the readability of code, reducing the complexity of code, and making it be extendable because the templates can be inherited and included in other templates in Twig. It sounds great, right? So, let's have a try with Twig right now.


IDE
According to the document from Twig, it shows that there are plenty of editors which are able to be used to implement Twig template. In this case, I chose Visual Studio Code as my IDE due to that I can have lots of extensions which helps me backup settings, highlight syntax and provide auto-completion for Twig template. The best thing is it's fast than Netbeans and Eclipse I used to implement projects in PHP and Java. Also, TwigFiddle is a very good online Twig template editor which provides varieties of Twig in different version and the template can be saved online. Furthermore, the testing data can be filled to test the Twig template in real-time. Or you can find other IDE and extensions by click here.

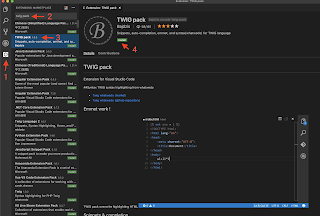
To install Twig Packs for VSC, please refer to the following photo:

Installation
In order to run a Twig template on the local machine, the Twig template engine has to be installed via Composer. The command for Twig template engine installation is as follows:

```sh
composer require "twig/twig:^2.0"
```

That's it. It's simple, right?

Trouble Shooting
Q: Where I can find my default PHP?
A: Execute  which php  

Q: What can I do if 'php -version' still shows php v5.x?
A:
Normally, the default PHP is allocated at `/usr/bin` on macOS. So, just edit your `~/.bash_profile` and insert `export PATH=/usr/bin:$PATH` in this file. After that, just execute `. ~/.bash_profile` to update settings.

Q: What can I do if I got Permission Denied when using composer to install Twig? A: By default, composer is installed in /vendor. So, just run the command as follows:
 sudo chown -R $USER /vendor  

Reference
Twig Install Twig by composer
Composer: file_put_contents(./composer.json): failed to open stream: Permission denied

[Apache] Configure Apache for PHP in Mac OS X 10.11.3 El Capitan

[Versions]
OS: Mac OS X 10.11.3
Apache: 2.4.16
PHP: 5.5.30

     In order to develop and test web pages on the local web server, I googled some blogs to figure out what I have to do. It took me a couple of hours to search and test which approach is workable. Finally, I found that Configure Apache for PHP in OS X 10.10 Yosemite / 10.11 El Capitan written by Donat shows me how to set web pages up under home folder of the current user and Configuring Apache Virtual Hosts on Mac OS X posted by McCreary indicates how to set a domain name pointing to localhost. In this post, I am going to demonstrate how to setup both approach in my Mac.

Before Setup:
What have to be done:
Check the version of Apache by the following command:
sudo apachectl -v

Check the version of PHP by the following command:
sudo apachectl -v

Setup:
    For the following demonstration, {username} represents the current username used to login operating system and {servername} represents the target hostname used to access the local website.
  1. Make sure there is a Sites folder in the home directory. If not, create it and ensure the permission is 644(dr-xr--r--). If it is not, use the following command to change it:
    sudo chmod 644 Sites

  2. Make sure /etc/apache2/users/{username}.conf is existed. If not, create it. In addition, update this file as follows:
    <Directory "/Users/{username}/Sites/">
        Options Indexes Multiviews FollowSymLinks
        Require all granted
        AllowOverride All
        Order allow,deny
        Allow from all
    </Directory>
    

  3. Add virtual host into /etc/apache2/extra/httpd-vhosts.conf as following:
  4. <VirtualHost *:80>
      ServerName {servername}
      DocumentRoot /Users/{username}/Sites
    </VirtualHost>
    

Configuration:
  1. Uncomment the following lines in /etc/apache2/httpd.conf:
    LoadModule deflate_module libexec/apache2/mod_deflate.so
    LoadModule userdir_module libexec/apache2/mod_userdir.so
    LoadModule rewrite_module libexec/apache2/mod_rewrite.so
    LoadModule php5_module libexec/apache2/libphp5.so
    Include /private/etc/apache2/extra/httpd-userdir.conf
    Include /private/etc/apache2/extra/httpd-vhosts.conf
    

  2. Then add index.php to the DirectoryIndex
  3. <IfModule dir_module>
        DirectoryIndex index.html index.php
    </IfModule>

  4. Uncomment the following line in /etc/apache2/extra/httpd-userdir.conf
  5. Include /private/etc/apache2/users/*.conf
    

  6. Restart Apache:
  7. sudo apachectl restart

  8. If there is any problem happened, run the following command to see the error messages:
  9. sudo apachectl configtest

Test:
     So far, the web server has been established and the pages can be accessed by the following URL:
http://localhost/~{username}

     If there is no web page in this folder, it will show the index of web pages. Put the HTML file or the PHP file to test it.

Mapping to the specific domain name:
       With regard to the URL shown above, it is not convenient for me to access every website with the long typing because I might have plenty of website on my local machine. In order to reduce the expenses of typing, I would rather use a shortened link to do it. The following steps show how to setup a specific domain name for the website.
  1. Open /etc/hosts as follows command:
    sudo vim /etc/hosts

  2. Append the server name and target IP at the end of this file. In this case, 127.0.0.1 can be set for multiple server names.
    
    ##
    # Host Database
    #
    # localhost is used to configure the loopback interface
    # when the system is booting.  Do not change this entry.
    ##
    127.0.0.1       localhost
    255.255.255.255 broadcasthost
    ::1             localhost
    
    127.0.0.1       {servername}
    

  3. Clear the local DNS cache by the following command:
    dscacheutil -flushcache

  4. Restart Apache.
  5. sudo apachectl restart
Test:
Just type:
http://{servername}


[Reference]
  1. Configure Apache for PHP in OS X 10.10 Yosemite / 10.11 Capitan
  2. Configuring Apache Virtual Hosts on Mac OS X
  3. Setting up a local web server on OS X

Build docker image from multiple build contexts

Build docker image from multiple build contexts ...