[GWT]How to use Google Web Toolkits - Installation

GWT version: 4.4
Eclipse version: 4.4 (Luna)
Java version: 1.7
OS: Mac OS X 10.10.1

  First of all, "Google Web Toolkit (GWT) is a development toolkit for building and optimizing complex browser-based application." The purpose of this toolkit is to make possible productive development of high-performance web applications without the developer having to be an expert in browser quirks, XMLHttpRequest, and JavaScript. It's open source and completely free as well. In this toolkit, it contains SDK and Plugin for Eclipse so that we can use Eclipse as the editor to develop web application we want. The steps of installation will be illustrated as follows.

  1.Setup Eclipse:
     Downloading Eclipse from official website. Normally, I will choose Eclipse IDE for Java EE Developers as my IDE because I prefer to use this tool to develop C or C++ on Mac. Extracting zip file directly when the downloading finished.

  2.Get Plugin for Eclipse (including SDKs)
        There are two ways to get Plugin for Eclipse, one is downloading from download page of GWT, another one is installing Google Plugin for Eclipse via a link such as http://dl.google.com/eclipse/plugin/x.x. The "x.x" is the version of Eclipse, such as 4.3 for Kepler and 4.4 for Luna. According to the user guide of configuration Eclipse, we need to use Install dialog to install this plugin. The steps of installation are as following:

    I. To choose "Install New Software".
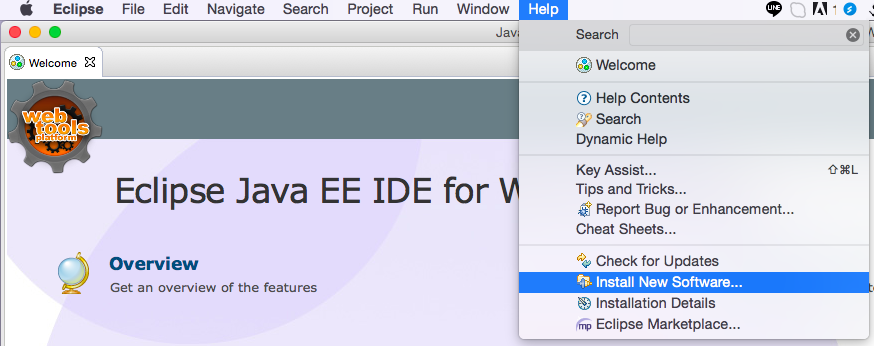
    II. Checking "Google Plugin for Eclipse(required)" and clicking "Next" button to complete the installation.

    The Eclipse needs to be restarted after installation. When the Eclipse restarted, we can use it for developing web application with GWT.

This is what we facing Nowadays.

I'm not sure what I can do to support the participants fighting for their future.
The only I can do is distributing what happened in my home country.
Let other people know what our teenagers caring and facing.

[Eclipse]新建立的Android專案出現"R cannot be resolved to a variable"

這問題其實是很詭異的,因為同樣是今年,只是在SDK是使用r20以前的時候,都可以正常建立新專案(這時的Target SDK為2.3.3)。但今天把它更新到r22.0後,就出現了標題所列的問題。

找了很多網路資料,不管是Clean後又Build,還是專案重建,都一樣的結果。

後來找到這篇「Android: r cannot be resolved to a variable」 ,他有提到是因為SDK4.x的專案建立的時候,會在res底下多出了value-v11以及value-v14這兩個資料夾。然後這個時候設定的Minimun Required SDK是設定為2.3.3。所以根據那篇的說法,這樣2.3.3的SDK是不認識那兩個資料夾,所以就變得無法產生R.java。

後來專案刪掉後重建的時候,把Minimun Required SDK選擇成4.2,就正常可以產生R.java了。

後來又為了要確認問題,所以把Minimun Required SDK、Target SDK、以及Compile With都設定為2.3.3。嘿嘿,好玩了,建立出來的專案一樣不能產生R.java。

所以這意思是,SDK Tools用了r22以後的,就不能編譯給2.3.3用的APP嚕?

後記:
結果打完這篇之後,建出來的專案又不正常了。
之後又找了其他參考,有人指出是需要Android SDK Build-tools。所以在更新這個tools之後,r就一切都正常了。


然後如果Unity還在用3.5.7以下的話,Android SDK Platform-tools請不要更新,不然會發生Unity無法編譯apk的慘劇。唯一的解決辦法就是把,Android SDK Platform-tools降版本至16.0.2以下,以及不要安裝Android SDK Build-tools。

(2013/06/27 - 目前確認,造成Unity無法編譯的是Android SDK Build-tools,僅需把Android SDK Build-tools移除掉,Unity就可以正常編譯了。)

[Unity]使用Plugin - JAR將二進位檔寫入至SDCard

Version:
  1.Unity                     : 3.5.7f6
  2.Anddroid                : 2.3.3
  3.Android SDK Tools : r22
  4.Eclipse                  : Juno SR2

    目前想在Unity上,將資料寫入到檔案內,可以使用System.io.File(C#)來進行純文字或是二進位資料的儲存。但是在Android上,如有需將檔案存入SDCard內,則需先設定檔案存取權限。在Android的app開發上,需要去新增android.permission.WRITE_EXTERNAL_STORAGE。這個權限設定之後,就可以進行檔案的讀寫(在4.1以後,則需另外設定讀取權限,android.permission.READ_EXTERNAL_STORAGE)。然而這個權限設定,Unity幫我們做到了,因此我們不需要在另外設定AndroidManifest.xml,僅需將「PlayerSettings」->「Per-Platform Settings」->「Write Access」 設定為「SDCard」即可。


    C#的讀寫檔方式,必須自行指定資料夾的路徑,所以如果當我們要把檔案寫道SDCard內的話,資料夾路徑會是「/mnt/sdcard/...」。如果SDCard的路徑被變更的話,那麼在程式內所指定的路徑就又要重新設定過。

    然而Android有提供取得SDCard的路徑功能,所以這邊就利用JAR的方式,讓Unity可以直接使用Android所提供的API,取得系統內所記錄的SDCard的實際路徑,並將檔案寫入到SDCard內。
 
在JAR內的程式碼為:
package com.drillingsaru.io.sdcard;  
 //Java  
 import java.io.File;  
 import java.io.FileOutputStream;  
 import java.io.IOException;  
 //android  
 import android.os.Environment;  
 import android.util.Log;  
 public class BinaryFileIO   
 {  
 //Write binary data into a file  
     public void WriteData(String FileName, byte[] DataBuf)  
     {  
         if( !this.IsExternalStorageMounted() ) {  
             this.mErrNo = ERR_STORAGE_NOT_MOUNTED;  
             return;  
         }  
         try  
         {  
         //Get the path of root folder (Return = /mnt/sdcard )  
             File rootDir = Environment.getExternalStorageDirectory();  
         //Create a output stream object  
             FileOutputStream outStream = new FileOutputStream(new File(rootDir.getPath(), FileName));  
         //Write Data                          
             outStream.write(DataBuf);  
         //Flush it  
             outStream.flush();  
         //Close self  
             outStream.close();  
             this.mErrNo = ERR_NONE;  
         }catch(Exception e){  
             Log.d("--WriteData--", e.getMessage());  
         }          
     }  
 }  


在Unity的程式碼為
using UnityEngine;  
 using System.Collections;  
 using System.Collections.Generic;  
 public class WriteData2SDCard : MonoBehaviour   
 {  
 #region Definition      
 /// <summary>  
 /// The package name and class name  
 /// package name = com.DrillingSaru.io.sdcard
 /// </summary>  
     public readonly string PACKAGE_CLASS_NAME = "com.drillingsaru.io.sdcard.BinaryFileIO";  
 /// <summary>  
 /// Student information  
 /// </summary>  
     public    class StudentInfo  
     {  
         public    int    Language        = 0;  
         public    int    Math    = 0;  
         public    int    Science    = 0;  
         public StudentInfo(int lang, int math, int science)  
         {  
             this.Language    = lang;  
             this.Math        = math;  
             this.Science    = science;  
         }  

         public StudentInfo(byte[] DataBuf)  
         {  
             this.Set(DataBuf);  
         }

     //轉換成byte陣列
         public byte[] GetBytes()  
         {  
             List<byte> RtnData = new List<byte>();  
             RtnData.AddRange(System.BitConverter.GetBytes(this.Language));  
             RtnData.AddRange(System.BitConverter.GetBytes(this.Math));  
             RtnData.AddRange(System.BitConverter.GetBytes(this.Science));  
             return RtnData.ToArray();  
         } 

     //轉換成結構資料
          public void Set(byte[] DataBuf)
          {
             int Offset = sizeof(int);
             int Shift = 0;
  
             this.Language = System.BitConverter.ToInt32(DataBuf, Shift);
             Shift += Offset;
   
             this.Math = System.BitConverter.ToInt32(DataBuf, Shift);
             Shift += Offset;
   
             this.Science = System.BitConverter.ToInt32(DataBuf, Shift);
             Shift += Offset;      
         }
     }  
 #endregion      
 #region InputData  
 #endregion  
 #region DataMebmer  
     private    StudentInfo            mStudentInfo    = new StudentInfo(500, 5, 10);  
     private    AndroidJavaObject    mDataWriter        = null;  
 #endregion          
 #region MemberFunc  
     private void Init()  
     {          
         this.mDataWriter = new AndroidJavaObject(PACKAGE_CLASS_NAME);  
     }  

 /// <summary>  
 /// write binary data to file
 /// </summary>
     private void WriteData()  
     {  
         if( this.mDataWriter == null )  
             return;  
     //設定傳入參數
         object[] args = new object[2];  
         args[0] = "testfile.bin";  
         args[1] = (object)this.mStudentInfo.GetBytes();  

     //呼叫函式
         this.mDataWriter.Call("WriteData", args);  
     }  

/// <summary>  
/// read binary data from file
/// </summary>
     private void ReadData_Test()
     {
         if( this.mDataWriter == null )
             return;
  
         byte[] RtnList = new byte[1024];
         object[] args = new object[1];
         args[0] = "testfile.bin";
         RtnList = this.mDataWriter.Call("ReadData", args);  
  
         this.mStudentInfo.Set(RtnList);
     }
#endregion          

 #region SystemFunc  
     void Awake()  
     {  
         this.Init();  
     }  
     // Use this for initialization  
     void OnEnable ()   
     {  
         this.WriteData();  
     }  
     void Update ()   
     {  
     }  
 #endregion      
 }  

用了上述的Plugin後,就可以將二進位檔存至SDCard了。

[Unity]Plugin建立過程 - JAR

Version:
  1.Unity                        : 3.5.7f6
  2.Anddroid                 : 2.3.3
  3.Android SDK Tools : r22
  4.Eclipse                     : Juno SR2

 這邊使用簡單的計算範例來呈現,如何建立要給Unity使用的Plugin。 這邊的Plugin是使用JAR。

 1.建立新的Android專案 
    I.在Eclipse介面上,點選「File」->「New」->「Project」。

    II.選擇「Android Application Project」。


    III.設定相關設定,這邊就依個人的需求,自行設定即可。

    IV.專案建立過程中,[Create custom launcher icon]與[Create activity]預設都會被勾選。但是目前並用不到這兩個設定,所以在這裡就把這兩個設定設定為不選擇。


    V.取消[Create custom launcher icon]與[Create activity]後,按下「Finish」按鈕,就可以完成專案建立的流程了。


    VI.建立好的專案架構如下圖


    VII.加入新的[Package]:於[src]上按下滑鼠右鍵->[New]->[Package]


    VIII.設定[Package]的名稱,[Package]的名稱會在Unity內使用到。


    IX.新增[Class]給[Package]在新建立好的[package]上按下滑鼠右鍵->[New]->[Class]


    X.設定[Class]的名稱,這邊設定的名稱之後也會在Unity內使用到。


    XI.建立想要使用的功能的程式碼
         A.Number Adder:
package com.calculator.numberincreasing;  
 public class NumberAdder   
 {  
     public int Add(int base, int factor)  
     {  
         return (base + factor);  
     }  
 }  


         B.Number Multiple:
package com.calculator.numberincreasing;  
 public class NumberMultipler   
 {  
     public int Multiple(int base, int rate)  
     {  
         return (base * rate);  
     }  
 }  


    XII.程式碼編寫完成後,就可以透過[Export]的方式將程式封裝,並交給Unity使用。
           專案上按滑鼠右鍵->[Export]。

    XIII.選擇[Java]->[JAR File]

    XIV.把要匯出的資料勾選起來,這邊預設會勾選所有的資料夾。 然後指定JAR檔要輸出的位置即可。

2.如何在Unity內使用JAR檔內的方法:
I.把JAR檔放到"./Asset/Plugins/Android/"下即可。(Plugins與Android資料夾皆需要自行建立)

II.建立操作用的Script
public class Calculator : MonoBehaviour   
 {  
     private int Org = 10;  
     private int factor = 20;  
     private int Mutiple = 30;  
     private int Added = 0;  
     private int Mutiplier = 0;  
     private AndroidJavaObject    mCal = null;  
     // Use this for initialization  
     void Start ()   
     {          
     //產生NumberAdder物件  
         this.mCal = new AndroidJavaObject("com.calculator.numberincreasing.NumberAdder");  
     //建立傳入參數陣列  
         object[] arglist = new object[2];  
         arglist[0] = (object)this.Org;  
         arglist[1] = (object)this.factor;  
     //呼叫方法,並取得回傳值  
         this.Added = this.mCal.Call<int>("Add", arglist);          
         this.mCal = new AndroidJavaObject("com.calculator.numberincreasing.NumberMultipler");          
         arglist[0] = (object)this.Org;  
         arglist[1] = (object)this.Mutiple;  
         this.Mutiplier = this.mCal.Call<int>("Multiple", arglist);  
     }  

//輸出測試結果
     void OnGUI()  
     {  
         GUI.Label(new Rect(100.0f, 100.0f, 100.0f, 50.0f), string.Format("Org = {0}\nAdded = {1}\nMultipled = {2}", this.Org, this.Added, this.Mutiplier));  
     }  
 }  

   如果要使用JAR檔內的類別,需要透過AndroidJavaObject來產生目標類別的物件。 在產生AndroidJavaObject時所傳入的名稱為Package名稱與Class名稱的合稱。(Package = com.calculator.numberincreasing, Class = NumberAdder. Package.Class = com.calculator.numberincreasing.NumberAdder) 之後再使用AndroidJavaObject.Call()來操作指定的函式。

III.產生apk檔,並安裝到Android裝置內。

  透過上述方式,就可以把一些方法封裝到其它的Package內。然後就可以給其它的專案使用。
  如有需要使用到一些Android的API,也可以透過Plugins的方式來使用。

[Android]存取External Storage

在權限的部分,需在Manifest檔內加入:
<uses-permission android:name="android.permission.WRITE_EXTERNAL_STORAGE" />
<uses-permission android:name="android.permission.MOUNT_UNMOUNT_FILESYSTEMS" />
前者為設定可讀寫的權限。是必備的。
後者是設定可掛載或是卸載可移除式儲存裝置。(如沒有加入這個權限,則在進行檔案操作時,會出現"Permission Denied"的錯誤訊息)。

A.之後在進行檔案寫入的動作時
    1.如果是要寫入二進位的資料,可用FileOutputStream.write()直接寫出檔案。
private void WriteData(String Data)  
{
//Check the state of storage
    if( !Environment.MEDIA_MOUNTED.equals((Environment.getExternalStorageState())) ) {  
        Log.d("WriteData", "--SDCard has been removed.--");  
        return;  
    }  

    try  
    {  
    //Get the path of root folder  
        File rootDir = Environment.getExternalStorageDirectory();  

    //Create a output stream object  
        FileOutputStream outStream = new FileOutputStream(new File(rootDir.getPath(), "IOTestFile.dat"));  

    //Write Data  
        byte[] buffer = new byte[BUFFER_SIZE];  
        buffer[0] = 0x30;  
        buffer[1] = 0x31;  
        buffer[2] = 0x32;  
        buffer[3] = 0x33;  
        buffer[4] = 0x34;  
        outStream.write(buffer, 0, 5);  

    //Flush it  
        outStream.flush();  

    //Close self  
        outStream.close();  

    }catch(Exception e){  
        Log.d("--WriteData--", e.getMessage());  
    }          
}  
要注意的是,使用FileOutputStream時,要把FileOutputStream放到try...catch()內。 Environment.getExternalStorageDirectory()可以取得到目前External storage所在的路徑。
    2.如果是要寫入純文字檔,可用FileOutputStream與OutputStreamWriter.append()來將資料寫入檔案內。
private void WriteDataWithOutputStreamWriter()  
{  
    try  
    {  
        String FuncName = "WriteDataWithOutputStreamWriter";  

    //Check the SDCard state  
        if(!Environment.MEDIA_MOUNTED.equals(Environment.getExternalStorageState()))  
        {  
            Log.d("WriteDataWithOutputStreamWriter", "======== External SD Card not mounted ===========");  
            return;  
        }  

    //Get the path of the root folder  
        File rootDir = Environment.getExternalStorageDirectory();  

    //Create file object  
        File FileContent = new File(String.format("%s/%s/IOTestFile.dat", rootDir.getParent(), rootDir.getName()));  

        if(!FileContent.createNewFile())  
        {  
            Log.d(FuncName, "Cannot create file");  
        }  
        Log.d("WriteDataWithOutputStreamWriter", String.format("======= Target Path = %s ============", FileContent.getPath()));  

    //Create a output stream object  
        FileOutputStream outStream = new FileOutputStream(FileContent);  

    //Create a output stream writer  
        OutputStreamWriter streamWriter = new OutputStreamWriter(outStream);  

    //write data  
        streamWriter.append("lalalala");  

    //close writer  
        streamWriter.close();  

    //close output stream object  
        outStream.close();  
    }catch(Exception e){  
        Log.d("--WriteDataByOutputStreamWriter--", e.getMessage());  
    }
}  
B.如果是要讀取檔案,則可以用:
    1.讀取二進位檔的內容,則可用FileInputStream來取得資料即可。
private String ReadData()  
{  
    try  
    {  
    //Get the path of root folder  
        File rootDir = Environment.getExternalStorageDirectory();  

    //Create a input Stream Object  
        FileInputStream inStream = new FileInputStream(new File(rootDir.getPath(), "IOTestFile.dat"));  

    //Load the data from target  
        byte[] buffer = new byte[BUFFER_SIZE];  
        int DataLen = inStream.read(buffer);  
        if(DataLen == -1)  
        {  
            Log.d("ReadData", "========= Reading Data has problem. ==================");  
            throw new IOException("Reading Data has problem.");  
        }  

        inStream.close();  

    //Show data  
        TextView text = (TextView)findViewById(R.id.editText1);  
        String OutText = "";  
        for(int i = 0 ; i < 5 ; i++)  
        {  
            Log.d("ReadData", String.format("--------- Data(%x) has been loaded from %s -------------", buffer[i], rootDir.getPath()));  
            OutText += String.format("%x", buffer[i]);  
        }  

        text.setText((CharSequence)OutText);
    }catch(Exception e){  
        Log.d("--ReadData--", e.getMessage());  
    }  
    return "";  
}  

[CListCtrl]拖曳檔案至List上方

如要操作行為正確,此方法需先繼承CListCtrl之後,並改寫OnDropFiles()。

如不太強調行為正確,則改寫Dialog的OnDropFiles()也可以。

這邊選用偷懶的方式,直接改寫Dialog的OnDropFiles()。

1.先要將Dialog(CListCtrl)的Accept File屬性打開,這樣才能將檔案拖到Dialog上面並丟下。

2.加入自定訊息的

3.ON_WM_DROPFILES()

enum eMyListCtrl{ WM_USER_CHANGE_LIST = WM_APP + 0x0100 };  
   
 ON_MESSAGE( WM_USER_CHANGE_LIST, OnDropFilesToList )  
   
 void CFileSearchDlg::OnDropFiles(HDROP hDropInfo)  
 {  
   // TODO: Add your message handler code here and/or call default  
    char  cFilePathName[_MAX_PATH] = {0};  
    UINT nNumOfFiles = DragQueryFile(hDropInfo, 0xFFFFFFFF, NULL, 0); //文件的个数  
    for ( UINT nIndex=0 ; nIndex&lt; nNumOfFiles; ++nIndex )  
    {  
      DragQueryFile(hDropInfo, nIndex, cFilePathName, _MAX_PATH); //得到文件名  
      // 把得到的文件名传给父窗口  
      LPARAM lParam = (LPARAM)cFilePathName;  
      //GetParent()->SendMessage(WM_USER_CHANGE_LIST,0,lParam);  
      this->SendMessage(WM_USER_CHANGE_LIST,0,lParam);  
    }  
   
   CDialog::OnDropFiles(hDropInfo);  
 }  
   
 LRESULT CFileSearchDlg::OnDropFilesToList(WPARAM wParam, LPARAM lParam)  
 {  
   //m_wndListCtrl.DeleteAllItems();  
   char * cFilePath = (char *)lParam;// 得到拖放文件的路径  
   
   //Check is dir or File Path  
   this->SearchFileList(cFilePath);  
   
   return true;  
 }  

[Unity]AnimationState

參考資料:AnimationState
Unity版本:3.5.6f4

        一般在控制AnimationClip播放時,都會使用Animation類別來控制。但如果想要控制播放速度時,確沒有介面可以控制。所以如果要變更播放各個AnimationClip的播放速度的話,就需要直接操作Animation內所儲存的AnimationStates。底下就針對AnimationState的各個屬性與操作介面來進行測試。

I.屬性:
1.enabled:(bool)
        此屬性是用來控制目前所對應的AnimationClip能不能進行播放。所以在Animation Clip播放時,將AnimationState.enabled設為false時,時間軸就會停止在當下的時間。之後再把AnimationState.enabled設為true時,時間軸就會從目前停止的時間繼續往下播放。

2.weight:(float)
        目前文件寫的看不懂,所以先跳過。

3.wrapMode:(WrapMode)
        AnimationClip的播放模式,可以參考[Unity]Animation WarpMode

4.time:(float)
        動畫的播放時間軸,一般是從0到無限大。可以透過強制指定時間軸來讓動畫的時間軸移動到指定的時間,但此時動畫物件本身並不會到達指定時間的狀態,也就是動畫物件會停留在上次停止的位置。當開始播放動畫的時候,就會從指定的時間開始播放。

5.normalizedTime:(float)
        normalize的動畫時間。此屬性為0到1。0.5代表動畫的時間的中點。

6.speed:(float)
        動畫播放速度,此屬性等於1時,就是正常播放。如要反向播放的話,就只要給定負值就好。為了達到反向播放的效果,也要注意到WrapMode的問題,可以參考[Unity]Animation WarpMode

7.normalizedSpeed:(float)
        normalize的播放速度,一般是做為在兩個動畫間做同步播放使用。根據官方的說法,此屬性會比Animation.SyncLayer()易於使用。

8.length:(float)
        Animation Clip的總播放時間,單位為秒。

9.layer:(int)
        此屬性用來設定AnimationClip播放時的層級,層級會影響到計算動畫播放時的權重值。越高層級的AnimationClip在計算最後繪製權重時,比較可以優先得到自已所預期需要的權重值。而低層級的AnimationClip僅能使用高層級所不需用到的權重值,換句話說,也就是低層級的僅能撿高層級剩下的來用。

10.clip:(AnimationClip)
        要用來播放的AnimationClip。

11.name:(String)
        AnimationClip的名稱。

12.blendMode:(AnimationBlendMode)
        動畫的繪製模式。可參考     。

II.操作介面:
1.AddMixingTransform(Transform mix, bool recursive = true):
        把要有相同的動畫效果的GameObject.transform加到AnimationState內,這樣就可以使用同一個動畫效果套用到不同的GameObject上。這樣可以減少AnimationClip的製作數量。

        recursive設為true時,代表所有混合的transform的子物件都將會被以同樣的方式播放動畫。
(目前未測試成功)

2.RemoveMixingTransform(Transform mix):
        把加到AnimationState內的GameObject.transform移除。

[Unity]Animation WarpMode

參考資料:Animation.wrapModeWrapMode
Unity版本:3.5.6f4

在Unity內Animation的WrapMode可以透過Script來變更。以下針對各個參數進行說明:

1.WrapMode.Default:
        直接拿Amination Clip內設定的wrapMode來進行動畫播放。預設的wrapMode為WrapMode.Once。

2.WrapMode.Once:
        當動畫時間軸到達Animation Clip終點時,正在播放中的Animation Clip會被自動的停止播放,並且時間軸會被重設回Animation Clip的一開始。

         不過當Animation Clip是從終點反向播放到起點時,雖然在播放到起點時會也會被自動停止,但是時間軸並不會被重置回終點,而是留在起點。

3.WrapMode.Loop:
        當動畫時間軸到達Animation Clip的終點時,時間軸會又回到起點的位置,並且繼續播放動畫。如果將播放模式設為反向時(即將Animation[ClipName].speed設為負值),則會從反向播放動畫,而播放的起點與終點都會跟正向播放時相反。

Note:根據官方的說法,將AnimationState.speed設為負值時,Animation Clip就會被反向播放(A negative playback speed will play the animation backwards.)。但目前測試由3dMax匯出的Animation以及使用Unity Animation所做出的Clip,在播放移動Animation時,把AnimationState.speed設為-1,播放的結果是物件直接跳到起始位置,並沒在從終點移動到起點位置。這邊還需要再確認問題點在那邊。

Note(2012/11/20):
        今找到原因了,原先測試時,只有變更AnimationState.speed,而沒有去變更AnimationState.time。所以播放時,時間軸就已經在0的位置了,也因此看不到動畫做動。如要反向播放動畫則需變更AnimationState.Speed為負值以及設定AnimationState.time不為起點。

4.WrapMode.PingPong:
        當動畫時間軸到達Animation Clip的終點時,時間軸會在往起點的方向前進。這個動畫效果會使物件重複的在Animation Clip的起點與終點之間來回的播放動畫。對於需要來回反複播放的動畫而言,就可以設定成此狀態。

5.WrapMode.ClampForever:
        當動畫時間軸到達Animation Clip的終點時,時間軸將會停止在Animaiton Clip的終點,且動畫播放狀態依然是播放中,也就是Animation不會停止Animation Clip的動畫播放。而如果設定為反向播放時,時間軸到達起點時,也一樣會停止在起點,且Animaiton Clip也是在播放中的狀態。也因此,此設定會使Animation Clip只播放一次。

        根據官方文件的說法,這個設定可以用在播放時間軸到達終點後不打算結束的Additive Animation上。根據測試的結果為,動畫物件是會停在時間軸的結束狀態下,但AnimationStates[].time還是會持續的增加或是減少(依據設定的播放時間值)。


        在Animation以及Animation Clip上都有WrapMode的屬性,而透過Script去設定時,卻有些許的不同。對於wrapMode這個屬性,在Animation本身上,是可以在播放中就去設定,而且會立即生效;但是當Animation Clip正在播放中的時後,AnimationClip.wrapMode是不能被變更的(唯讀狀態)。


以下為操作測試:
I.在Script內去變更Animation.wrapMode時,WrapMode會立即的套用在Animation Clip的播放上(如果是透過Inspector來變更,則WrapMode不會立即的套用在Animation Clip的播放上),但Animation Clip.warpMode還是保持原本的設定。

例如:Animation.wrapMode原本設定為WrapMode.Once,Animation Clip.wrapMode也設定為WrapMode.Once。在Animation.Play()之後,且Animation Clip播放完畢之前,將 Animation.wrapMode改為WrapMode.PingPong。則此時看到的動畫效果就變成來回播放,但是Animation Clip.wrapMode還是依舊為WrapMode.Once。

II.在Script內去變更Animation Clip.wrapMode時,WrapMode會立即套用到Animation Clip.wrapMode,但是並不會影響到正在播放的Animation。

例如:Animation.wrapMode原本設定為WrapMode.Once,Animation Clip.wrapMode也設定為WrapMode.Once。在Animation.Play()之後,且Animation Clip播放完畢之前,將 Animation.wrapMode改為WrapMode.PingPong。則此時看到的動畫還是播完後就停止了,但此時又再重新播放動畫的話,動畫效果還是一樣只播一次。不過在Animation Clip.wrapMode的設定上,是有被變更為WrapMode.PingPong。


例外原因:
        會出現上面的狀況是因為Animation是透過AnimationState來控制動畫的播放。根據目前的測試,在編輯模式下,AnimationStates是一個空的陣列(圖1.)。當啟用Play模式時,Animation會把在Animations內所指定的Animation Clip的name以及wrapMode新增到AnimationStates內(圖2.)(Animation Clip的設定請參考圖3.)。由這邊看出Unity看起來是在Animation初始化的時候取得AnimationClip.wrapMode,並加到AnimationState內。

圖1.編輯模式下的Animation States

圖2.Play模式下的Animation States

圖3.AnimationClip的設定

        在上述的狀況下,變更Animation Clip.wrapMode(圖4.),此時卻發現一開始加到AnimationStates的wrapMode卻沒有變更。所以由此推測,這邊的wrapMode是從AnimationClip.wrapMode複製來的,而不是取得參考。這也可以指出,為什麼在Animation沒有重新取得AnimationClip時,播放的結果總是不同於設定的值。所以之後再怎麼變更AnimacionClip.wrapMode,Animatoin也不可能知到目前指定的AnimationClip已經有任何的變化。

                   圖4.變更AnimationClip.wrapMode           圖5.[圖4.]狀態下的Animation資訊

解決方案:
i.在使用Unity Editor的模式下,僅需再重新Play Game Mode,就可以使用到變更後的WrapMode。

ii.在使用編譯後的執行檔時,有三種方法可以使用變更後的WrapMode:
     1.重新載入場景。
     2.刪除目前GameObject所持有的Animation元件,並再重新加入Animation元件與Animation Clip
        後。如要用這方法,則需在刪除Animation後的下一個Frame才可以再新增Animation元件,
        不然Unity會跳出物件還存在且不可重複加入的錯誤訊息。原因是Object.Destroy()所說的
       「物件的刪除總是在Update loop結束之後以及rendering之前發生」。
     3.直接將新的Animation Clip.wrapMode指定給Animation[Animation Clip.name].wrapMode。     

結論:
1.在Inspector修改Animation.wrapMode並不會立刻套用到目前的播放上。(AnimaitonStates不會被立即變更)

2.透過Script修改Animation.wrapMode會立即套用到所有的AnimationClip(包含目前的播放)在Animation Component內的wrapMode上。(AnimationStates會被立即變更)

3.變更過的AnimationClip.wrapMode需要Animation Component進行重載後,才會更新到AnimaitonStates。

4.播放中的Animation Clip是不能進行wrapMode的變更。

[Unity]Animation Component - Attributes

參考資料:Scripting > Runtime Classes > Animation

         跟據官方的說法,這個元件是用來做動畫播放使用。而整個動畫系統是利用「權重」的方式來進行動畫的播放。相關內容可以參考Unity Manual > Animation Scripting。底下針對Animation所提供的屬性來進行說明。

1.clip(Animation Clip)
        在沒有指定播放的clip時進行播放時,所會播放的Animation clip。即在Script內呼叫Animation.Play()時,Animation Component就會播放此組clip。在Inspector底下所看到的屬性如圖.1的紅框框選處。

圖1.Animation設定介面

2.playAutomatically:(bool)
        這個屬性是用來決定在GameObject啟動(Active)時,是否要播放預設的Animation Clip。也就是此值為true時,Animation System則會在GameObject設為啟動(Active)之後,自動播放Animation.clip的動畫內容。在Inspector底下所看到的屬性如圖.1的綠框框選處。

3.wrapMode:(WrapMode)
        此屬性是用來決定當Animation Clip播放完畢時,接下來要做何種處理。可以參考[Unity]Animation WarpMode

4.isPlaying:(bool)
        此屬性可用來判斷Animation Clip是否已經被播放完畢。當此屬性為true時,即是指定的Animation Clip還在播放中;反之為false時,則代表指定的Animation Clip已經停止播放了。

5.this[string name]:(AnimationState)
        此Indexer可以透過Animation Clip的名稱來取得其所用到的AnimationState。因此如有需要修改AnimationState的屬性時,就可以使用此屬性。說明測試也可以參考[Unity]AnimationState

6.animatePhysics:(bool)
        這個屬性是用來設定Animation播放時,會不會受到物理引擎的影響。當此屬性設為true時,Animation Clip播放時,就會被加到物理引擎內進行計算。但如要使此設定有效時,還必需先在要播放Animation Clip的GameObject上加上RigidBody,並設定成會受物理引擎影響。在Inspector底下所看到的屬性如圖1.的黃框框選處。

Note:目前測試在播放水平移動的動畫時,再加上重力影響時,高度座標的的確是有所改變。
         但其變化量比無播放動畫時的狀況還要來的小很多。

7.cullingType:(AnimationCullingType)
        跟據官的說法,當culling被起動時(也就是設定不是AnimationCullingType.AlwaysAnimate),Unity會在animation不會被使用者看到時,自動的停止AnimatoinClip的播放。因此這個設定是用來節省效能消耗。當動畫元件被culled的時候,AnimatoinState、Event或是Sample Animation(可以參考animation.sample() usage)都不會有做用。在Inspector底下所看到的屬性如圖1.的紫框框選處。(不過目前測試沒有成功的試出來。)

8.localBounds:(Bounds)
      此屬性為Animation的動畫元件(animation component)在區域座標(local space)下的Axis-aligned minimum bounding box(AABB)。跟據官方的說法,此屬性在預設的條件下,是跟據動畫狀態(animation state,也就是所附加的Animation Clip)來計算的。而使用者也可以透過重新指定數值來變更目前的localBounds。
 
      如有要數值更改回原設定值,就僅需將Animation.cullingType設定為AnimationCullingType.BasedOnClipBounds即可。在Animation.cullingType沒有設定為AnimationCullingType.BasedOnClipBounds或是AnimationCullingType.BasedonUse的時候,此屬性是沒有被定義的。然而當Animation.localBounds被設定時,系統就會自動將Animation.cullingType設定為AnimationCullingType.BasedOnUserBounds。

使用Google Code Prettify來顯示程式碼

這邊網路上可以找到不少的參考資料,但為了自己方便尋找,所以就根據參考來源,備份一份資料。

參考來源:
1.優力歐不眠夜[在 blogger 中加入 google-code-prettify]
2.Google-Code-Prettify


I.設定:
使用方式如下:
1.登入網誌後台後選擇『範本』->『修改HTML』

2.在HTML內找到</head>,並將下列程式碼貼在</head>的前面。
<link href="http://google-code-prettify.googlecode.com/svn/trunk/src/prettify.css" rel="stylesheet" type="text/css"></link>
<script src="http://google-code-prettify.googlecode.com/svn/trunk/src/prettify.js" type="text/javascript"></script>

3.然後在body標籤內加上onload='prettyPrint()'。
(參考資料是利用<script>prettyPrint();</script>; )

4.存檔後,就可以用了。


II.如何使用:
之後如果在文章內需要貼程式碼時,就需要在HTML模式下,加入下面的語法。
<pre class="prettyprint lang-*">
//要顯示的文字
</pre>
「*」表示要用來顯示的語言類型,定義請參考How do I specify the language of my code?


III.實作範例:
用起來的感覺會像是底下這樣(用C++作範例)
[HTML語法]
<pre class="prettyprint lang-cpp">
class MyClass
{
    private:
        int Counter;
        std::vector&lt;int&gt; mCountList;

    public:
        MyClass(void);
        
    public:
        void Show(void);
}
</pre>

[顯示畫面]
class MyClass
{
    private:
        int Counter;
        std::vector<int> mCountList;

    public:
        MyClass(void);
        
    public:
        void Show(void);
}
在要顯示的程式碼內,如果有要用到「<」、「>」,要記得,一定要換成HTML裡面用的「&lt;」及「&gt;」。不然會變成一片空白嚕。


IV.行號顯示:
如果要顯示行號的話,就要在原本的lang後面加上linenums即可。
[HTML碼]
<pre class="prettyprint lang-cpp linenums">
class MyClass
{
    private:
        int Counter;
        
    public:
        MyClass(void);
        
    public:
        void Show(void);
}
</pre>

[顯示畫面]
class MyClass
{
    private:
        int Counter;
        std::vector<int> mCountList;

    public:
        MyClass(void);
        
    public:
        void Show(void);
}


如果在顯示區間內所顯示的程式碼是從原先的程式碼的第100行開始,就可以在linenums後面加上分號以及開頭的行號數值,這樣prettyprint就會把目前這段程式碼應該所在的行號標出來了。
[HTML碼]
<pre class="prettyprint lang-cpp linenums:100">
class MyClass
{
    private:
        int Counter;
        
    public:
        MyClass(void);
        
    public:
        void Show(void);
}
</pre>

[顯示畫面]
class MyClass
{
    private:
        int Counter;
        std::vector<int> mCountList;

    public:
        MyClass(void);
        
    public:
        void Show(void);
}

不過目前google code prettify在顯示行號上,就只會顯示(行號 Mod 5 == 0 &&行號 > 0)的行數的行號嚕。


雖然用起來有點麻煩,但是顯示上看起來還算可以嚕。
如果覺得上面的方法太麻煩,還有現成的網頁工具可以用,Source Code Formatter for Blogger, Blogspot , Blog & Blogging, Format Formatting Tool
好處是,他可以幫你解決符號轉換的問題,也可以顯示每行的行號,缺點是,就沒有顏色了。XD

Build docker image from multiple build contexts

Build docker image from multiple build contexts ...