Build docker image from multiple build contexts

Build docker image from multiple build contexts

Building a docker image requires specifying a source of truth to include in the image from a local directory or a remote git repository. In the previous version, the docker BuildKit allows users to specify the build context from a single source of truth only. However, the engineers may need to have the context from different locations based on the type of files. For instance, icons, images or other resources that are not included in the same package, including the resource from other docker images. Fortunately, the Docker Buildx toolkit supports multiple build context flag for Docker 1.4. Let's learn how to use this new feature.

The following list is a shortcut for jumping into a specific topic handy.

What version of Docker is this tutorial targeting?

All of the examples and use cases are working against Dockerfile 1.4 and Buildx v0.8+. Please ensure the version of Dockerfile and Buildx before starting this tutorial. If you would like to install or upgrade the Docker Engine, please refers to
Install Docker Engine page.

How to specify the version of Dockerfile frontend?

To specify the version of a Dockerfile frontend, by adding a line of code at the top of the file as:

# syntax=docker/dockerfile:1.4 ## List other instructions below this line

Learn More

How to install/upgrade Buildx?

It's very easy to install or upgrade Buildx tool by executing:

docker buildx install

Learn More

Why do we need the Build Context flag?

To build an image by docker, the single build context from a local repository is given from a path in the docker build command as:

docker build -t ${imageName}:${tag} .

However, this is not allowed to access files outside of specified build context by using parent selector(../) for security reasons. This leads to the build context must be at the root directory, sometimes it is not the project directory, if the developers would like to build an image for an application referencing multiple resources outside of the folder of an application. And it results in many COPY and ADD instructions being written in the Dockerfile to achieve this goal, which reduces the readability of code. Fortunately, Dockerfile 1.4 and Buildx v0.8+ support multiple build context flags right now. This reduces the complexity of Dockerfile and provides more flexibility in organising build contexts in the code with CI/CD pipeline.

What is the Build Context flag?

Build context flag allows developers to define the build contexts from local directory, Git repository, HTTP URL and Docker Registry.

The syntax of the build context flag is:

docker buildx build \ --build-context ${name}=${pathToContext} \ -t ${imageName}:${tag} \ .

${name} is the name of the build context, must be lowercase, which will be used in the Dockerfile and the ${pathToContext} is the location of the build context which could be local directory, remote git repository, HTTP URL to a tarball and Docker image.

Also, Dockerfile 1.4 supports multiple build contexts for an image by using:

docker build \ --build-context ${context1}=${pathToContext1} \ --build-context ${context2}=${pathToContext2} \ -t ${imageName}:${tag} \ .

By using build context flags, developers can copy the context outside of the project directory.

Load build context from a Local Directory

Load build context via relative file path

Build context flag accepts relative file path and absolute file path when the user would like to build an image from the files in a local directory.

The relative file path can be specified by the following two ways:

docker buildx build \ --build-context app=./workspaces/greeting \ -t ${imageName}:${tag} \ .

Learn More

Or

docker buildx build \ --build-context app=workspaces/greeting \ -t ${imageName}:${tag} \ .

Learn More

Then using COPY --from=${buildContextName} in the Dockerfile to copy files:

FROM node:14.17.1-alpine AS sourceStage WORKDIR /source COPY --from=app ["./", "/source/workspaces/greeting"]

Learn More

Combine multiple build contexts

Buildx can deal with multiple build contexts as well. For example, docker.tutorial is a monorepo that has a configuration file for packages at the root directory level as follows:

. +-- docker.tutorials | +-- dockerfiles | +-- greeting | +-- calculator | +-- workspaces | +-- greeting | +-- calculator | +-- package.json | +-- tsconfig.json | +-- README.md

It would be good to copy package.json file only through the build context flag rather than copying the whole directory to have the configuration file in the image.

docker buildx build \ --build-context repo=. \ --build-context app=workspaces/greeting \ -t ${IMG_NAME} \ .

Learn More

FROM node:14.17.1-alpine AS sourceStage WORKDIR /source COPY --from=repo ["./package.json", "/source"] COPY --from=repo ["./tsconfig.json", "/source"] COPY --from=app ["./", "/source/workspaces/greeting"]

Learn More

Load build context via absolute file path

If the build context is not in the same directory as follows:

. +-- resources | +-- icons +-- docker.tutorials | +-- dockerfiles | +-- greeting | +-- calculator | +-- workspaces | +-- greeting | +-- calculator | +-- package.json | +-- README.md

The absolute file path could be fit in this case:

docker buildx build \ --build-context resources=/Users/Documents/resources/icons \ -t ${imageName}:${tag} \ .

Learn More

Note: Please do not use tilde(~) in the file path. Buildx cannot find the build context in this form.

Alternatively, the build context can be accessed by notating double-dot(..) when the directory is in the parent folder of the current location:

docker buildx build \ --build-context resources=../resources/icons \ -t ${imageName} \

Learn More

Load build context from a Git repository

Clone the git repository via HTTPS

It is quite simple to load build context from a Git repository by specifying the URL of the repository and tagging the branch name with hash(#) at the end of the URL as:

docker buildx build \ --build-context repo=https://github.com/OttoHung/docker.tutorial.git#main \ -t ${imageName}:${tag} \ .

Learn More

By this way, the build context will be cloned to a directory whose name is as same as the repository in the WORKDIR. For example, the name of the repository is docker.tutorials then the build context will be stored in a directory named docker.tutorials as follows:

. +-- ${WORK_DIR} | +-- docker.tutorials | +-- README.md | +-- node_modules | +-- LICENSE +-- bin +-- usr

In the Dockerfile, using COPY --from=${buildContextName} to copy the build context from the temporary directory into a work directory as follows:

## Stage name is not compulsory if it is not a multi-stage build ## But `FROM` instruction must be provided. ## Learn more from https://docs.docker.com/engine/reference/builder/#from FROM node:14.17.1-alpine AS sourceStage WORKDIR /source COPY --from=repo ["./", "/source"]

Learn more

However, Buildx cannot clone a private repository when the access is unauthenticated. An error message is returned as fatal: could not read Username for 'https://github.com': terminal prompts disabled. [Learn More] It looks like Buildx clones the repository before executing instructions and there is no other way to provide access tokens to Buildx currently.

The solution for this circumstance could use --secret to pass Personal Access Token(PAT) to Buildx:

pat=${PAT} \ docker buildx build \ --secret id=pat \ -t ${IMG_NAME} \ .

Learn More

Then using RUN instruction to clone the remote repository which is much safer than embedded the PAT in the URL in the command line.

RUN --mount=type=secret,id=${SECRET_ID} \ PAT=$(cat /run/secrets/${SECRET_ID}) \ git clone https://${PAT}@${REPO_URL}.git

Learn More

Clone the git repository via SSH

By assigning a SSH URL to Buildx like:

docker buildx build \ --build-context repo=git@github.com:OttoHung/docker.tutorials.git#main \ -t ${imageName}:${tag} \ .

Learn More

However, the remote repository cannot be cloned and an error message returned as unsupported context source **git@github.com** for ${BUILD_CONTEXT_NAME}.

To resolve this issue, it is recommended to use --ssh and RUN instruction with Buildx to clone the repository as follows:

docker buildx build \ --secret id=npm,src=$HOME/.npmrc \ --ssh default=$SSH_AUTH_SOCK \ -t ${IMG_NAME} \ .

Learn More

FROM node:14.17.1-alpine AS sourceStage WORKDIR /source ## node-alpine doesn't include openssh-client and git by default RUN apk update && apk upgrade \ && apk add openssh-client git ## To store SSH key temporarily RUN mkdir -p -m 0700 ~/.ssh \ && ssh-keyscan -H ${HOSTING} >> ~/.ssh/known_hosts RUN --mount=type=ssh git clone ${REPO}

Learn More

Then the build context will be cloned into the same folder structure listed at Clone the git repository via HTTPS

Load build context from a tarball via HTTP URL

Build context flag also supports downloading tarball(*.tar or *.tar.gz) via an HTTP URL as:

docker buildx build \ --build-context dockerTutorial=https://github.com/OttoHung/docker.tutorials/archive/refs/tags/tarball.tar.gz \ -t ${imageName}:${tag} \ .

Learn More

Once the tarball file has been downloaded, it is required to unpack tarball before copying the contents to another work directory. On macOS, tar -xzf could be used to unpack the tarball.

FROM node:14.17.1-alpine as sourceStage WORKDIR /source ARG TARBALL_NAME ## tarball must be downloaded by COPY instruction then be unarchived ## by tar command COPY --from=tarball ["./", "/source"] RUN tar -xzf ${TARBALL_NAME}

Learn More

It is recommended to double-check the directory name is as same as the tarball name or not before making a tarball. If the names of both are different, such as the tarball packed by GitHub Release, the folder name must be given to the Dockerfile to copy the contents because the tarball name is not the same.

Load build context from a docker image

Dockerfile 1.4 supports that the docker image can be loaded by FROM instruction with the URL of the image as:

FROM https://ghcr.io/OttoHung/greeting:latest

Or specify the name of the docker image:

FROM alpine:3.15

Learn More

In the command prompt, the docker image must go with docker-image:// prefix to tell what docker image to load. For example:

docker buildx build --build-context image=docker-image://alpine:3.15 \ -t ${imageName}:${tag} \ .

Learn More

Then using FROM instruction to import the image:

FROM image AS sourceStage

Learn More

Also, an image digest following up on the tag of the image can be used to specify a particular version for the image as:

docker buildx build --build-context image=docker-image://ghcr.io/ottohung/docker.tutorials:git-https@sha256:b9f33235036f68d3d510a8800e27e3b6514142119cbd5f4862f0506d8cc8552d \ -t ${imageName}:${tag} \ .

Learn More

Build Context flag is also a convenient way to specify other docker images for the build, such as base image and image for app, from command prompt dynamically. In this way, it's easy to change the base images without modifying Dockerfile and it's not necessary to write multiple Dockerfile for different platforms.

docker buildx build --build-context baseImage=docker-image://alpine:3.15 \ --build-context appImage=docker-image://node:14.17.1-alpine \
Reference

How to use Markdown in Blogger

Markdown becomes the most popular documenting language in any technical documentation nowadays. The benefit of using Markdown is getting formatted and highlighted sentences in the short typing. However, Blogger doesn't support Markdown natively at the time going. In order to use Markdown in Blogger, I googled it online and found there is a useful framework built by `cs905s` on https://github.com/cs905s/md-in-blogger. In this post, I will list down how to implement this and a sample to show if the Markdown still working on this post. The following way works on my Blogger as you see on this post. If it doesn't work on your Blogger, please feel free to leave a comment or visit https://github.com/cs905s/md-in-blogger.
1. Go to Theme
1. Click Customise -> Edit HTML
1. Paste the following code before `</head>` 
```html
<link href="//cdnjs.cloudflare.com/ajax/libs/highlight.js/9.9.0/styles/default.min.css" rel="stylesheet"></link>
```
1. Paste the following code before `</html>`
```html
<script src="//cdnjs.cloudflare.com/ajax/libs/highlight.js/9.9.0/highlight.min.js" type="text/javascript"></script>
<script src="//cdnjs.cloudflare.com/ajax/libs/showdown/1.6.2/showdown.min.js" type="text/javascript"></script>
<script src="//cdnjs.cloudflare.com/ajax/libs/jquery/3.1.1/jquery.min.js" type="text/javascript"></script>
<script src="//mxp22.surge.sh/markdown-highlight-in-blogger.js" type="text/javascript"></script>
```

Once you have configured the template, you can use Markdown in `HTML view` by click `<>` at left hand side in the toolbox. However, it doesn't work in the `Compose view`. So please use `Preview` to see the result of rendering.

> Note: < and > are the preserved characters in HTML, please use & lt; and & gt; in your markdown.


In your each post, you just type markdown in the following section to render Markdown:
```html
<pre class="markdown">
</pre>
```

---
----- Mark Down Sample as follows -------
# This is header

# Unordered List
- List 1
  - List 1-1
- List 2

# Ordered list
1. Number 1
  1.1. Number 1.1
  1.1. Number 1.2
1. Number 2

# Table
| To Left | Centre | To Right |
|:--------|:------:|---------:|
|(1,1)    | (1,2)  | (1,3)    |
|(2,1)    | (2,2)  | (2,3)    |

# Mermaid (Not supported Yet)
```mermaid
graph LR
A[Square Rect] -- Link text --> B((Circle))
A --> C(Round Rect)
B --> D{Rhombus}
C --> D
```

# Reference
-  https://github.com/cs905s/md-in-blogger

[Katalon] How to activate Katalon Studio

After the Katalon Studio has been installed by the instruction of [Katalon] How to install Katalon Studio, we have to activate Katalon Studio before using it.

The steps of activation are very simple as well as follows:
  1. Open the Katalon Studio
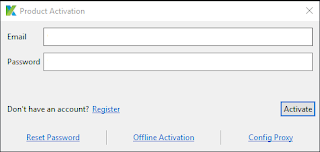
  2. Fill your registered Email and Password to activate Katalon Studio, then click "activate" button.


  3. Have fun with Katalon Studio

Is it easy, right? Let's do some practice for test cases in the next section.

Next: [Katalon] How to create a test case by using Record & Playback


[Katalon] How to install Katalon Studio

Note: The screenshot may differ than the actual web pages if Katalon updates their official website. (Date of the screenshot is 06/2019)

Katalon Studio is a free automation testing solution built on top of the automation frameworks Selenium, Appium with a particular IDE for API, web app and mobile app testing. By using Katalon, Git, JIRA, Slack, Jenkins, can be integrated into the automation testing flow work.

Let's learn how to install Katalon Studio in the few steps in an easy way:
      1. Go to the home page of Katalon at https://www.katalon.com/
      2. Click the "Download Now" button


      3. Create an account for activating Katalon Studio and upload the testing report to Katalon Analysis.


      4. The downloading progress of installation file according to your operating system will be started automatically. If it does not, just choose the platform from the dropdown list and click the "Download" button.


After the installation finished, we can start to "activate" Katalon Studio for further tutorials.


[GCP] How to fix "Permissions error fetching application.. " while deploying a service to an existing project

It's simple to fix this problem by the following steps:

1. use `gcloud config list` to see the setting of the current project.

2. If the `project` field is used with the project name, using "PROJECT-ID" instead by `gcloud config set project {{ PROJECT-ID }}`.

3. run `gcloud app deploy` again, this problem will be resolved.


# Reference

gcloud app deploy ERROR: Permissions error fetching application [apps/]

[Tutorial] How to use variables in Twig

The tools used in this tutorial are as following:
|Spec        | Version      |
|:------------:|--------------|
|OS          | MacOS 10.14.3|
|PHP         | >= 7.0    |
|Twig        | 2.x          |

Note. This post is written in Markdown language which has not been supported in Blogger for mobile browser yet . Please read this article by a desktop computer for a better experience.

# Introduction
Like other languages, Twig has variables and expressions for developers and designers to implement user interface template. In this section, let's see how to use variables in Twig.


# How to do
It's simple to write a variable in Twig as in PHP. 
```twig
{# if name is kitty by setting #}
  name
```


However, it will be printed as plain text in the webpage if we write a variable as above. 
```
name
```


In order to print the value of the variable, a pair of curly braces have to be used to enclose the variable.
```twig
  {# if name is kitty by setting #}
  {{ name }}
```

Then Twig template engine will print it on the webpage. ``` kitty ```
The variables are also able to be manipulated in the control structure: ```twig {% set name = 'kitty' %} {% if name is not empty %} {% set greeting = "Hello " ~ name %} {% else %} {% set greeting = "Hellow Anonymous" %} {% endif %} {{ greeting }} ```
The result is: ``` Hello kitty ```
If the variable is an object, the attributes(properties) of a variable can be accessed by a dot symbol(.). ```twig house.door ```
The attributes of a variable are also able to be accessed by "subscript" syntax. However, it doesn't work for the attributes which have special characters, such as '-', in the name. ```twig house['door'] ```
In order to let designer and developer access attributes which have special characters in the name, Twig provides `attribute()` for designer and developer to access attributes. ```twig attribute(house, 'data-door') ```
A null will be returned if a variable or attribute does not exist when the `strict_variables` option is set to false, otherwise, Twig will throw an error.
The convenient thing is multiple variables can be assigned values at the same time in one line: ```twig {% set door, room = 4, 2 %} ``` It is equivalent to: ```twig {% set door = 4 %} {% set room = 2 %} ``` # Practice Let's do some practice. The JSON object for practice is as follows: ```json { "houses":[ { "name": "1 storey house", "door": 4, "window": 4, "room": 4 }, { "name": "2 storey house", "door": 4, "window": 4, "room": 2 } ] } ```
Let's print the details of houses: ```twig {% for house in houses %} {{ house.door }} doors in {{ house.name }} {% endfor %} ```
The result will be: ``` 4 doors in 1 storey house 4 doors in 2 storey house ``` # Setting Variables The variables can be set a value, such as string, integer, floating number, array, and key-value pairs, by Control Structure in a variant way. ## Set a string to a variable ```twig {% set var = 'this is a string' %} {# Tests the result #} {{ var }} ``` The result will be ``` this is a string ```
## Set an integer to a variable ```twig {% set var = 15 %} {# Tests the result #} {{ var }} ```
The result will be ``` 15 ```
## Set a floating number to a variable ```twig {% set var = 12.33456 %} {# Tests the result #} {{ var }} ```
The result will be ``` 12.33456 ```
## Set a string array to a variable ```twig {% set string_array = ['one', 'two', 'three', 'four'] %}
{# Tests the result #} {% for str in string_array %} {{ str }} {% endfor %} ```
The result will be ``` one two three four ```
## Set an integer array to a variable ```twig {% set integer_array = [1, 2, 3, 4] %} {# Tests the result #} {% for int in integer_array %} {{ int }} {% endfor %} ```
The result will be ``` 1 2 3 4 ```
## Set a floating number array to a variable ```twig {% set float_array = [1.1, 2.2, 3.3, 4.4] %}
{# Tests the result #} {% for float in float_array %} {{ float }} {% endfor %} ```
The result will be ``` 1.1 2.2 3.3 4.4 ```
## Set key-value pairs to a variable, and the key is string ```twig {% set map_str_key = {'one': 'first', 'two': 'second', 'three': 'third'} %} {# Tests the result #} {% for key, value in map_str_key %} [{{ key }}] = {{ value }} {% endfor %} ```
The result will be ``` [one] = first [two] = second [three] = third ```
## Set key-value pairs to a variable, and the key is integer ```twig {% set map_int_key = {1: 'first', 2: 'second', 3: 'third'} %} {# Tests the result #} {% for key, value in map_int_key %} [{{ key }}] = {{ value }} {% endfor %} ```
The result will be ``` [1] = first [2] = second [3] = third ```
If we store key as an integer, we can use square brackets(`[]`) to manipulate this variable: ```twig {# this will throw an error [0] = {{ map_int_key[0] }} #}
[1] = {{ map_int_key[1] }} [2] = {{ map_int_key[2] }} [3] = {{ map_int_key[3] }} ```
The result is: ``` [1] = first [2] = second [3] = third ```
When we use this approach to manipulate the variable, we must be careful that does not access the key which doesn't exist. Otherwise, an error will be thrown.
## Set a block of value to the variable The `set tag` not only accepts a line of value but also accepts a multiple lines value. Let's see how to implement it. If we want to use a set block to set value, the value should be enclosed by `{%set ... %}` and `{% endset %}`. ```twig {% set integer_array = [1,2,3,4] %} {% set ints %} <ol> {% for int in integer_array %} <il>{{ int }}</il> {% endfor %} </ol> {% endset %} {# Shows the result #} {{ ints }} ```
The result is ```html <ol> <il>1</il> <il>2</il> <il>3</il> <il>4</il> </ol> ```
However, the `{% set ... %} ... {% endset %}` code block doesn't convert JSON string into an object and it cannot be used to assign key-value pairs: ```twig {% set home %} { 'door': 4, 'room': 2, 'toilet': 1 } {% endset %} {# Shows the result #} {{ home }} {# this doesn't show anything #} {% for item in home %} {{ item }} {% endfor %} {# this will throw error #} {{ home['door'] }} ```
The result is: ``` { 'door': 4, 'room': 2, 'toilet': 1 } ```
As a result, the `{% set ... %} ... {% endset %}` code block only treats the value as text as the demonstration in the [official document](https://twig.symfony.com/doc/2.x/tags/set.html). If we use HTML tags assigned to the variables in this sort of code block and automatic output escaping is enabled, the HTML tags will be encoded to make sure the content is safe. ```twig {% set trh = '<tr>' %} {% set tre = '</tr>' %} {% set tdh = '<td>' %} {% set tde = '</td>' %} {% set table %} <table> {{ trh }} {{ tdh }} cell 1 {{ tde }} {{ tdh }} cell 2 {{ tde }} {{ tdh }} cell 3 {{ tde }} {{ trh }} {{ trh }} {{ tdh }} cell 4 {{ tde }} {{ tdh }} cell 5 {{ tde }} {{ tdh }} cell 6 {{ tde }} {{ trh }} </table> {% endset %} {# shows the result #} {{ table }} ```
The result will be: ```html <table> &lt;tr&gt; &lt;td&gt; cell 1 &lt;/tr&gt; &lt;td&gamp;t; cell 2 &lt;/tr&gt; &lt;td&gt; cell 3 &lt;/tr&gt; &lt;tr&gt; &lt;tr&gt; &lt;td&gt; cell 4 &lt;/tr&gt; &lt;td&gt; cell 5 &lt;/tr&gt; &lt;td&gt; cell 6 &lt;/tr&gt; &lt;tr&gt; <table> ``` ## Variable Scope If a variable has been declared inside a `for` loop, it cannot be accessed outside of the loop. ```twig {% set list=[1,2,3,4,5] %} {% for i in list %} {% set result = i %} {% endfor %} {# An error will be thrown #} {{ result }} ```
But it can be accessed if it has been declared outside the loop: ```twig {% set list=[1,2,3,4,5] %} {% set result = 0 %} {% for i in list %} {% set result = i %} {% endfor %} {# The result is 5 #} {{ result }} ```
# Filter A filter can be applied to the variables to trim space, lowercase all of the characters, merge an array and so on. ```twig {% set name = ' Kitty' %} {# this will print 'Kitty' instead of ' Kitty' #} {{ name }} ```
This will be introduced in the next tutorial.
# Reference [Twig Variables](https://twig.symfony.com/doc/2.x/templates.html#variables) [set Tag](https://twig.symfony.com/doc/2.x/tags/set.html) ## Relevant Readings [How to setup development environment for Twig on MacOS](https://totsi04.blogspot.com/2019/02/tutorial-how-to-setup-development.html)

Find Window's Handle through PID

```cpp
typedef _ProcessHwnd

{

  DWORD ProcessID;
  HWND hwndProcess;

} PROCESSHWND, * PPROCESSHWND;


DWORD GetHWNDForProcess(DWORD ProcessID, PHWND ProcessHWND);
BOOL CALLBACK FindProcessHWNDThruEnum(HWND hwnd, LPARAM lParam);

// example function
// returns 0 if success, results of GetLast Error if not
// ProcessID is the process you are interested in
// ProcessHWND will have the process' associated window handle.
// Or NULL, if the process doesn't have a window
//
// Usage: GetHWNDForProcess(ProcId, &ProcHWND);
//

DWORD GetHWNDForProcess(DWORD ProcessID, PHWND ProcessHWND)
{
  DWORD ErrValue = 0;
  BOOL fEnumWindows = FALSE;
  PROCESSHWND prochwndFind;

// Initialize the structure
  memset(&prochwndFind, 0, sizeof(prochwndFind));
  prochwndFind.ProcessID = ProcessID;
  fEnumWindows = EnumWindows(FindProcessHWNDThruEnum, (LPARAM) &prochwndFind);

// Make sure EnumWindows succeeded
  if(fEnumWindows){
    *ProcessHWND = prochwndFind.hwndProcess;
  }else{
   ErrValue = GetLastError();
  }
  return ErrValue;
}

// The EnumWindowsProc callback
BOOL CALLBACK FindProcessHWNDThruEnum(HWND hwnd, LPARAM lParam)
{
  PPROCESSHWND prochwndFind;
  DWORD ThisProcessID = 0;
  DWORD ThisThreadID = 0; // For completeness, not needed

  prochwndFind = (PPROCESSHWND) lParam;
  ThisThreadID = GetWindowThreadProcessId(hwnd, &ThisProcessID);

  if(ThisProcessID == prochwndFind.ProcessID)
  {
    prochwndFind.hwndProcess = hwnd);
    return FALSE;
  }else{
    return TRUE;
  }
}
```

[Tutorial] How to setup development environment for Twig on MacOS

The tools used in this tutorial are as following:
OS                 : MacOS 10.14.3
PHP version : >= 7.0
Twig version : 2.x

Introduction
Twig is a template engine for the web developers and designers to implement user interface template in PHP by built-in tags, filters, and functions. The benefit of using Twig to implement user interface template is enhancing the readability of code, reducing the complexity of code, and making it be extendable because the templates can be inherited and included in other templates in Twig. It sounds great, right? So, let's have a try with Twig right now.


IDE
According to the document from Twig, it shows that there are plenty of editors which are able to be used to implement Twig template. In this case, I chose Visual Studio Code as my IDE due to that I can have lots of extensions which helps me backup settings, highlight syntax and provide auto-completion for Twig template. The best thing is it's fast than Netbeans and Eclipse I used to implement projects in PHP and Java. Also, TwigFiddle is a very good online Twig template editor which provides varieties of Twig in different version and the template can be saved online. Furthermore, the testing data can be filled to test the Twig template in real-time. Or you can find other IDE and extensions by click here.

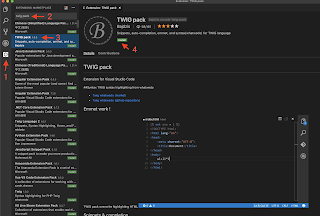
To install Twig Packs for VSC, please refer to the following photo:

Installation
In order to run a Twig template on the local machine, the Twig template engine has to be installed via Composer. The command for Twig template engine installation is as follows:

```sh
composer require "twig/twig:^2.0"
```

That's it. It's simple, right?

Trouble Shooting
Q: Where I can find my default PHP?
A: Execute  which php  

Q: What can I do if 'php -version' still shows php v5.x?
A:
Normally, the default PHP is allocated at `/usr/bin` on macOS. So, just edit your `~/.bash_profile` and insert `export PATH=/usr/bin:$PATH` in this file. After that, just execute `. ~/.bash_profile` to update settings.

Q: What can I do if I got Permission Denied when using composer to install Twig? A: By default, composer is installed in /vendor. So, just run the command as follows:
 sudo chown -R $USER /vendor  

Reference
Twig Install Twig by composer

Composer: file_put_contents(./composer.json): failed to open stream: Permission denied

How to avoid shopping on a fraud website

As for the post about the frauds ads on Facebook, I would like to share some basic tricks to let you get rid of the fraud website.

1. Domain name is always as same as the brand name.
 The fraud website cannot use the official domain registered by the brand already. If the website represents the official website, check the domain name first. But read the domain name carefully, some fraud side will use a similar name to cheat you, such as www.leg0.com or www.Iego.com. The best way is to google the name of the shop and sees if Google can find it. Also, check the details what Google shows to you.


2. The layout(details) of the website

If the layout of the website is awful or everything mixed together, you should be careful that it must be a fraud website. For instance, this website screenshot the rating, but not to implement it. If you can not see any review on the website, it must be a fraud.


3. Do not pay by Credit Card or Bank Transfer 
 The scammers will reuse your card details to make more requests. Pay by PayPal or other organisations which can suspend/hold the payment when you make a dispute is the best choice.


4. Do more research before you place an order
 Use the keyword on the website on Google to see how many people visit this site and interacted with it. Just be careful the fraud review because the scammers are not along.


If you still cannot make sure that website is a fraud or not, just leave it alone and ignore the popup ads from the social media because it is not worth to pay the money you got by your hard working.


May the force be with you.

Useful Links: (Before clicking the link below, it's a good practice to google the title of links for avoiding phishing)

Beware of the fraud ads on Facebook timeline

It's not about the coding but this can save your pocket. My wife tried to buy a Christmas gift for me from an online shop which pretends as an official Lego website and advertises on Facebook. The website looks like the official one on the mobile, however, it doesn't do it well for the desktop version.

The photo of products looks like the official one. If I don't open it on my laptop, I won't find the awful design of this website. So, please check the details, such as the rating, of the product before place an order. The rating on this page is photocopied so that we cannot see the actual review or rating. This shop tries to create more new Facebook accounts and advertise on it, even someone report the fraud ads to Facebook.


I'm so so sorry for that it makes my wife lose $100. As a result, Do not buy anything from the ads on Facebook to prevent fraud ads. Just Google the name of the shop which you already knew and someone has bought something from it. Or chose the shop which accepts PayPal, then you may have a chance to get your money back if it's a fraud shop, but you still have to take a risk. In my opinion, the best way is that only buy the stuff from wherever you trust.

By the way, don't click the ads underneath this post which provided by Google if you don't know that shop. I trust Google but people make mistake as same as me. Good luck, guys.

[GAE] How to create GWT project updated by Gradle for GAE on Eclipse

This is a stretch for the memo right now and it will be enhanced with photo or video later.

1. Create a GWT project by GWT plugin
2. Right click on the project -> Configure -> Convert to App Engine Standard Project
3. Right click on the project -> Configure -> Add Gradle Nature
4. Create text file named build.gradle file under project folder.
5. Write the configuration of this project in build.gradle.
   For example:

//This section used for classpath setup
def ROOT_PATH = '{{ root_path_of_project }}'
def LIBS_PATH = ROOT_PATH + '{{ root_path_of_lib }}'
def MODULE_PATH = ROOT_PATH + '{{ root_path_of_module }}'

//Uncomment this field when trying to fetch the latest version of libraries.
apply plugin: 'java'
apply plugin: 'gwt'
apply plugin: 'eclipse'
apply plugin: 'war'

//Script version
version = '1.0'

//this concept is used to define the external dependencies that are available to the classloader 
//during the execution of Gradle build script. In the declaration of dependencies only be used 
//the method classpath, and you can’t use the configurations compile , runtime, testCompile, etc. 
//because this block is just to declare external libraries references available to the classpath, 
//if you need to provide any configuration like compile or runtime you need to do outside of BuildScript block.
buildscript{
 repositories {
  //The repository where to fetch gwt gradle plugin
  jcenter()
  
//  maven {
//            url 'http://dl.bintray.com/steffenschaefer/maven'
//        }
 }
 
 dependencies {
  //0.6
  classpath 'de.richsource.gradle.plugins:gwt-gradle-plugin:0.6'
 }
}


//Central repository to load the GWT library
//indicates where Gradle looks for any required dependency, in this case in the Maven central repository. 
//For this example get gwt libraries and automatically fetch gwt dependencies; 
//while the script is executing some lines like these appears in the console.
repositories{
 mavenCentral()
}

eclipse{
 //To setup output classess folder for gwt project
 classpath{
  defaultOutputDir=file("war/WEB-INF/classes")
 }
/*
 project{
  //To setup linked resource folder
  linkedResource name:'{{ name_of_linked_ref }}', type:'2', location: LIBS_PATH + '{{ path_of_linked_ref }}'
 }
 
    classpath {
        file {
            withXml {
                def node = it.asNode()
                node.appendNode('classpathentry', [kind: 'src', path: '{{ name_of_linked_ref }}', exported: true])
            }
        }
    }
*/ 
}

gwt{
 gwtVersion='2.8.1'
 modules 'com.digsarustudio.qbox.QBox'
 
 sourceSets{
  main{
   java {
    srcDir 'src'
   }
  }
  
  test{
   java {
    srcDir 'test'
   }
  }  
 }
 
 logLevel = 'INFO'
 
 minHeapSize = "512M"
 maxHeapSize = "1024M"
 
 superDev{
  noPrecompile=true
 }
 
}

dependencies {
 //google cloud sql factory - This is very important for the project which uses Cloud SQL as the database.
/* 
 compile 'com.google.cloud.sql:mysql-socket-factory-connector-j-8:1.0.10'
*/ 
 compile 'com.google.cloud.sql:mysql-socket-factory:1.0.9'
 
 //Google Gruava - For Cloud SQL MySQL Socket Factory
 compile 'com.google.guava:guava:26.0-jre'

  //[Optional] For NoClassDefFoundError while including MySQL Socket Factory Connector
  compile group: 'org.ow2.asm', name: 'asm', version: '5.2'
}


6. Right click -> Gradle -> Refresh Gradle Project(This will break the GAE project structure)
7. Reorganise the structure of folders to meet the GWT requirements
8. Copy the customised or 3rd party libraries under /war/WEB-INF/lib
9. Change the .level FROM WARNING to INFO in the logging.properties file if you want to see the INFO log in the logger.
10. Add <load-on-startup>1</load-on-startup> under a required servlet tag in the web.xml and <warmup-requests-enabled>true</warmup-requests-enabled> into appengine-web.xml if you need this servlet has to been initialised when this app starts up.

That's it. The next section will show how to deploy this GWT project upto the Google App Engine.

Coming soon:
 1. How to make GWT project to use Cloud SQL in Java 8
 2. How to skip the file amount limitation of a GWT project which is going to upload to Google App Engine.
 3. How to initialise configuration of Web App when the app starts up.

Note:
 For point 6:
     After refresh the project, Gradle will reset the content of "{{ project_folder }}/.settings/org.eclipse.wst.common.component". This leads to that Eclipse cannot deploy the GAE project due to the appengine-web.xml cannot be found. The plugins will go through {{ project_folder }}/WEB-INF to look for it. However, WEB-INF is under {{ project_folder }}/war for GWT. To fix this issues, please place the following text of section in to this file:
<?xml version="1.0" encoding="UTF-8"?>
<project-modules id="moduleCoreId" project-version="1.5.0">
  <wb-module deploy-name="{{ project_name }}">
   <wb-resource deploy-path="/" source-path="/war" tag="defaultRootSource" />
        <wb-resource deploy-path="/WEB-INF/classes" source-path="/src"/>
        <wb-resource deploy-path="/WEB-INF/classes" source-path="/test"/>
   
   <property name="context-root" value="{{ project_name }}"/>
   <property name="java-output-path" value="/{{ project_name }}/war/WEB-INF/classes" />
  </wb-module>
</project-modules>

Build docker image from multiple build contexts

Build docker image from multiple build contexts ...